• Home
  • About
  • Contact

Pam For The Glam

     Hi, Glamazons! As you know, the trend for beauty has really changed with the pandemic. It's hard to put on a full face with half of our faces covered by masks these days. Many of the glamazons I know have opted to focus on skincare or investing on longwearing makeup. Many prefer the minimal, often no transfer products that are  budge-proof under the mask. Another thing I see is the focus on eye makeup. 

    Nowadays, the eyes are practically the only features you see with half the face covered up. It actually makes sense that beauty enthusiasts emphasize and enhance this area with makeup. You can go bold with full eyeshadow with dramatic wings or subtle and simple, bare cat-eyed liner and any of these choices will kick up even the very basic masked look up a notch. There's something mesmerizing about perfectly winged eyes and even if you decide to go all bare and just use sunblock, the nicely done winged liner  just makes you look well put together.

    That being said, while winging out your eyeliner looks really good, sometimes it can be really hard to execute flawlessly. I play with makeup so often but I still struggle with the flick to get those sexy feline eyes effect with the wings. I will sometimes mess up my eye makeup altogether trying to get the look.

    I like the dramatically done eyes but seriously... The struggle is real sometimes. So it's really exciting to stumble upon hacks that make winging out your liner easier. I've tried some methods that have helped me out in this department but the third way I've seen is perhaps, by far, the easiest way to do it.


         The cat eye liner gives you a sultry look even with half of your face covered up

1. Use tape 

    Take a long piece of tape, put the middle of the tape under the tip of your nose and stick the ends on each outer corner of your eye. This will basically be where you trace the eyeliner at to make the wing. Only problem I have with this method is the tape disturbs the makeup or does not stick well on my skin layered with makeup or creams and sunblock.

2. Use a stiff card 

    You basically just need a clean stiff plastic card (like old membership cards or expired unused atm cards---please sanitize before using) to lay at the outer corner of your eyes to guide your flick. This can still be tricky though and can still disturb foundation where the card is placed. cards are also stiffer and unyielding and will not follow the grooves of your face. This is my least preferred method but it works for other people.

3. Use a stamp style eyeliner

    This is the quickest way to achieve the cat eye look for me and quite possibly the hack that doesn't mess up your foundation or have issues with tape adhesion. It's the fastest way to achieve the cat eye and the best eyeliner hack for beginners that want to get those even wings fast.


 Image from KIMUSE Official Store/Shopee Philippines

BEAUTY DEAL ALERT!!!!  KIMUSE actually has this product that works pretty much like a double-headed marker with a fine felt tip on one end that makes drawing the line on the lash line easier and actual wing stamps that create the even flicks on the left and right outer corners of your eyes. This International Women's month, take advantage of KIMUSE's beauty treat by clicking on this link to get a good deal on this beauty hack. You can get up to 80% off discount on products when you shop at KIMUSE on March 23 at Shopee Beauty.Have you tried this product? Let me know on the comments below how you liked it. Whether you want makeup or skincare, Shopee Beauty's got you covered. Get exclusive deals of up to 90% off, new launches  and exciting offers from your favorite brands and free shipping for with a minimum spend of P499! 

        Try the gorgeous and sexy cat eye look with your mask. You will definitely see a beautiful difference. Thanks for dropping by and may the glam be with you always!


Image from KIMUSE Official Store/Shopee Philippines


Share
Tweet
Pin
Share
No comments

 Hi, Glamazons! I've been a fan of Colourette for almost 2 years now and I recently purchased 2 matte colourtints I've been seeing people use on the social media platforms I've been frequenting. I got Robin and Jordyn because I was actually surprised that they could be used as contour as I only ever used colourtints for blush and as lip color. 


Colourette Colourtints in Jordyn and Robin

I was pleasantly amazed at how well these products worked on both minimal and full makeup. Both are very pigmented and both are very blendable. I was apprehensive about trying them out as contour and blush as these colors and the medium they come in aren't what I usually go for.

My favorite part of my makeup routine is contouring but I usually am unable to do this for natural, no foundation motds as powder contour just looks wrong on bare looking skin because they can look ashy or muddy. I don't do the natural makeup too often because I feel like it just makes my face look even rounder than it already is and just doesn't emphasize the bone structure for me. These 2 shades in liquid form seem to be the best colourtints that enable me to achieve the look that is the perfect balance between soft and snatched. They look great on bare skin or on top of tinted sunscreen. If you are wearing them for full glam, I would use them after applying foundation before the powder--- never after powder as it breaks up the base with its oil.


Robin and Jordyn swatches for comparison

In terms of color, they are similar in the sense that both are deep brown shades but are actually quite different in tone once applied on the skin. Robin is more of a warm and dark reddish brown while Jordyn is more of a cool, almost greyish brown taupe. For this reason, I love using Jordyn to contour and Robin to warm up my face. 

The colourtints have great staying power but they become virtually budge proof when set with a little powder.  I usually only ever have to lightly set the nose and eyelids with transparent powder as those are oily areas on my face. 

Blendability is amazing. I never have to worry about having to deal with streaks of unblended product stuck like some tints do where they stain too fast and too deeply where you initially placed them on your face. They also look amazing when used as eyeshadows.


Used Robin as my eyeshadow, blush and lippy while contouring with 
Jordyn. The only other products I used apart from the colourtints 
were tinted suncreen, liquid highlighter and a light feathering of a brow pencil

Price point is good. At 299 php each, they are actually a fabulous deal as a little goes a long way and they will last you for a long time. They are actually on sale right now for the 6.6 midyear sale. Interested in buying these babies? Click this link to buy them at a good price today.

I highly recommend these products from Colourette and I would definitely repurchase them once I run out. I hope you found this short beauty review helpful and may the glam be with you always! :)


Share
Tweet
Pin
Share
No comments

 Hi, Glamazons! 

I recently posted a video where I created an MOTD using only Ever Bilena items. I personally wanted to explore the brand's growth as a local makeup company for my readers. I was excited to work with all the available Ever Bilena products I could possibly use and were available to me for a full makeup look.

Luminous motd using only Ever Bilena products

Ever Bilena has stepped up its game through the years and have churned out competitive products that have the same exceptional quality as those we can buy from foreign brands. Some of their products I can even say are better and all of which are definitely more affordable. 

These face products are all amazing things to to use to achieve that flawless and sculpted base

Ever Bilena has improved its Eye and Brow game quite a bit 

Lip products for the look

So here are the products I used in the video to create the look. If you're interested in creating a similar look, you might want to take advantage of the nationwide 6.6 sale to get even better deals for them.

1. Ever Bilena Advance First Step Mattifying Primer

2. Ever Bilena Advance Brow kit

3. Ever Bilena Advance Fine Line Brow Liner in Lily

4. Ever Bilena Advance Brow Gel in Soft Brown 

5. Ever Bilena Advance Studio Finish Stick Foundation in Miel

6. Ever Bilena Advance Uncover Palette

7. Ever Bilena Advance All Day Eyeliner Pen

8. Ever Bilena Advance Eye Define Waterproof Matic Eye Liner in Smoke and Mocha 

9. Ever Bilena Advance All Day Foundation in Olive

10. Ever Bilena Matte 2 Way Cake in Golden Beige

11. Ever Bilena Contour Palette

12. Ever Bilena Matte Blush On in Milkweed

13. Ever Bilena Advance Glow Out Highlighter in Spotlight

14. Ever Bilena Matte Lip Liner in Toast of New York

15. Ever Bilena Matte Nudes in Bellisima

16. Ever Bilena Advance Mascara Duo

17. Ever Bilena Advance Lock That Look Makeup Setting Spray


Personally I loved creating the motd as it looks like a more youthful way of doing your makeup. I love the primer, the brow products, the liquid foundation, contour, blush and highlighter. If I could only ever have just 1 item I would choose either the contour palette or the highlighter.

Enjoy shopping for your favorite makeup and skincare during the mid year sale and get great discounts as well as free shipping. I hope you found this entry helpful and may the glam be with you always! :)


Share
Tweet
Pin
Share
1 comments
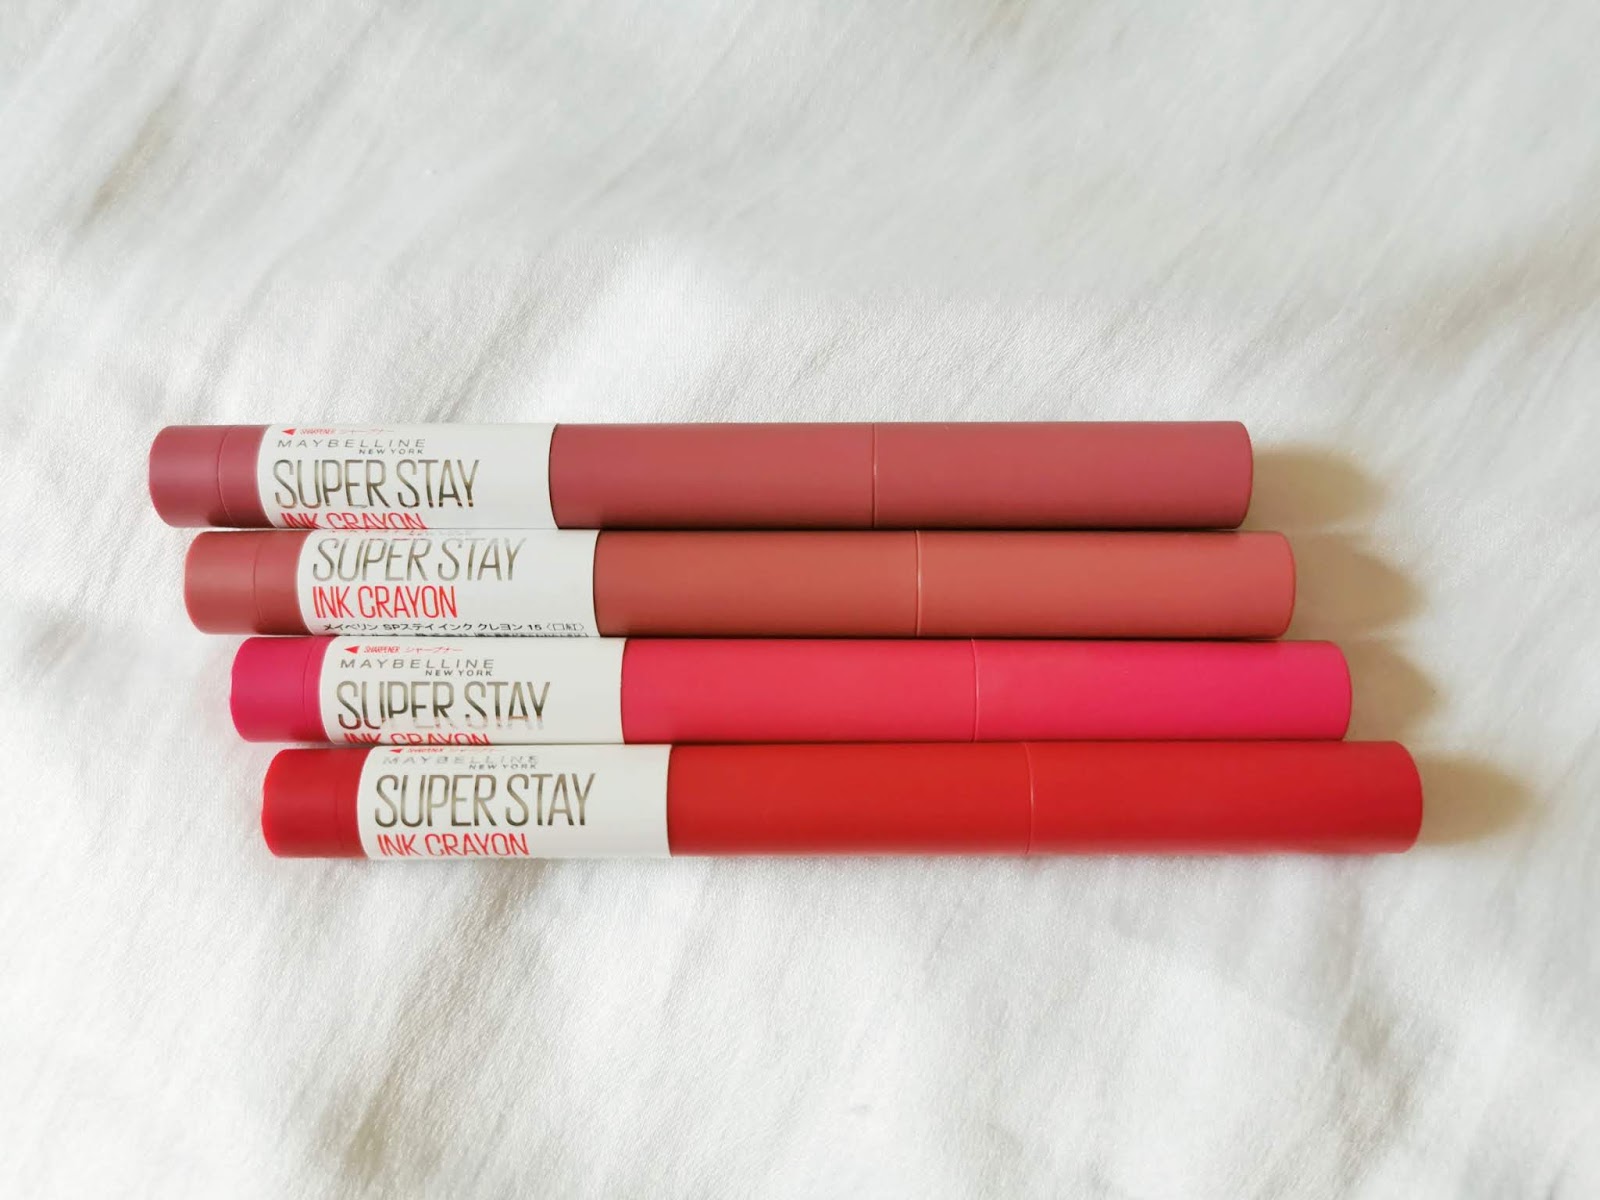
 Maybelline Superstay Ink Crayon (top to bottom- Stay Exceptional, Lead the Way, Treat Yourself, and Own Your Empire)


Hi, Glamazons! I haven't had a minute to myself lately so I haven't had much time to write. One of the recent makeup haul  I've been dying to write about is the Maybelline Superstay Ink Crayon line. I've only purchased four of the shades they have but I think I've got the neutrals, reds, and pinks covered with my choices. Curious about these babies? Read on!

The Packaging

Each lippy comes in a sleek, retractable, pen-type packaging with a cap. It also has a removable bottom that holds a sharpener. I love this type of packaging because it makes lipstick applications more precise and they don't take up too much space in your bag. 


This pencil type packaging has a detachable bottom piece that holds the sharpener

The Shades

Own Your Empire

A bright scarlet shade that has a blue undertone. This shade reminds of me of Riri Woo from Mac but isn't as drying as the usual matte reds I'm used to.

Treat Yourself

A vibrant fuchsia that demands attention. While this shade may not be for the faint of heart, it certainly looks great on the lips. I like using minimal eye makeup and letting this lippy be the star of my motd. This is actually my favorite shade of the four. 

Stay Exceptional

A nude pink with a slightly purple undertone. This shade reminds me of Colourpop's Lumiere 2 and looks great on most skintones. This is my go to nude as of the moment.

Lead the Way

A nude rosey mauve that may be the best choice for gals who favor neutral motds. 

Pros

>The formula feels light on the lips and has a satin feel when applied but sets into a lovely velvet matte

>Pen type packaging makes it easier to apply and it certainly looks cute. Sharpener is a definite plus to keep those edges crisp

>Long wearing. As long as you don't eat oily food, they pretty much stay in place all day.

>Affordable at 299 pesos each

>Has a subtle cocoa-vanilla scent. I prefer unscented but I this subtle scent is much better than products with waxy and alcohol laden scents.

>Easier to remove than the Superstay Matte Ink 

>Does not dry out my lips as much

Cons

>Tip is soft and if you don't make sure it's pointy, you can have smudged edges. 

>While it may be easier to remove, the lippies can still leave a faint stain on the lips

>Not completely transfer proof

At this point I'm just nitpicking because I really love these lippies. 


Swatches and Application

These lipsticks go on smoothly and they appear the same as the shade of their pen's packaging when swatched. I personally prefer going light on the eyeshadows for Own Your Empire and Treat Yourself because their colors pack a punch and they really bring the attention to your lips. I like the dramatic winged liner for them just to round up the look. For the neutral tones, you can wear a bolder look but they also work well with light makeup. 

I find that the best way to apply it is to layer it on until you get the opacity you want. I don't recommend rubbing your lips together while it's still fresh from the tube because it makes the product look uneven. Simply apply until you get the level of opacity you want and let it set. You can blot or press your lips together once the product has dried a bit.


Maybelline Superstay Ink Crayon swatches

Maybelline Superstay Ink Crayon when worn


Is it longwearing? Yes. For as long as you're not eating anything oily or if you're careful, the product stays on without any touch ups. It doesn't bleed out of the drawn area and the line stays crisp if you don't mess with it. There's some product transfer when you drink or eat but not a whole lot. I find that when the lippy becomes uneven, you can just press your lips together, it will even out some of the color. Unlike with the matte liquid lipsticks, layering over the older application won't cause any caking.

All in all, this is definitely a lip product I would recommend to all you glamazons. They're matte, vibrant, and kind on the lips. 

Thanks for dropping by and may the glam be with you always! :)


Share
Tweet
Pin
Share
No comments
Today's makeup beat

Hi, Glamazons! I created this motd to test out Snody as my skin prep, My Skin Breathe as my primer, and Loreal Infallible Fresh Wear to see how my look will hold up with the combo of products for a typical day I  have full makeup on.


This look lasted for about 8 hours without touch ups, 1 snack and dinner.

Wear test


The products I used for this look are:

Skin Prep: Snody Propolis, My Skin Breathe
Brows: Missha, Careline Better Than Basic Brow Liner, Naturactor Coverface
Eye: ABH Subculture, Estee Lauder Mascara, EB Advance Eyeliner,
Base: Loreal Infallible Fresh Wear, Bench Daily spell, Hoola bronzer Becca Moonstone
Lips:  Colourpop Beeper Maybelline Rich Wine
Setting Spray: Human Nature Rosewater

After 8 hours

Just applied Motd 


So this is the look I went with for this post. Eight hours for an motd is pretty great for me and if you want to recreate the look, just check out the products I used.

Thanks for dropping by and may the glam be with you always!


Share
Tweet
Pin
Share
No comments
Newer Posts
Older Posts

About Pam for the Glam


Pau Ruta is a self- taught MUA and beauty enthusiast who wants to encourage positive self-image, self-love, and confidence.

Read More...

Follow Me

  • facebook
  • instagram
  • youtube

Sponsor

Blog Archive

  • ▼  2026 (22)
    • ▼  September (1)
      • The Mom-Shaped Hole She Left Behind
    • ►  August (3)
    • ►  July (6)
    • ►  June (1)
    • ►  May (2)
    • ►  April (4)
    • ►  March (3)
    • ►  February (1)
    • ►  January (1)
  • ►  2025 (43)
    • ►  December (2)
    • ►  November (3)
    • ►  October (2)
    • ►  September (11)
    • ►  August (6)
    • ►  July (6)
    • ►  June (2)
    • ►  May (5)
    • ►  April (3)
    • ►  March (1)
    • ►  February (1)
    • ►  January (1)
  • ►  2024 (28)
    • ►  December (1)
    • ►  November (6)
    • ►  October (1)
    • ►  July (2)
    • ►  June (3)
    • ►  May (2)
    • ►  April (3)
    • ►  March (5)
    • ►  February (4)
    • ►  January (1)
  • ►  2023 (9)
    • ►  December (2)
    • ►  November (2)
    • ►  September (1)
    • ►  August (2)
    • ►  April (1)
    • ►  March (1)
  • ►  2022 (6)
    • ►  November (1)
    • ►  September (1)
    • ►  August (1)
    • ►  July (1)
    • ►  June (1)
    • ►  March (1)
  • ►  2021 (2)
    • ►  June (2)
  • ►  2019 (8)
    • ►  October (1)
    • ►  September (1)
    • ►  August (1)
    • ►  July (2)
    • ►  May (2)
    • ►  March (1)
  • ►  2018 (7)
    • ►  November (1)
    • ►  October (3)
    • ►  July (1)
    • ►  May (1)
    • ►  January (1)
  • ►  2017 (21)
    • ►  December (1)
    • ►  November (2)
    • ►  October (3)
    • ►  September (2)
    • ►  August (4)
    • ►  July (1)
    • ►  June (1)
    • ►  May (2)
    • ►  March (2)
    • ►  January (3)
  • ►  2016 (27)
    • ►  December (2)
    • ►  November (8)
    • ►  October (2)
    • ►  September (2)
    • ►  August (1)
    • ►  July (2)
    • ►  June (2)
    • ►  May (3)
    • ►  April (5)
  • ►  2014 (3)
    • ►  September (3)
Powered by Blogger.
FOLLOW ME @pamfortheglam

@pamfortheglam

Created with by ThemeXpose